Access Database
Back
to Computer Sharing Skills Index
How To Create A New Database?
On the following pages I will show you how to set up a
database from scratch in Access. When you first load Access you will be
presented with a window
1) Load Access.
|
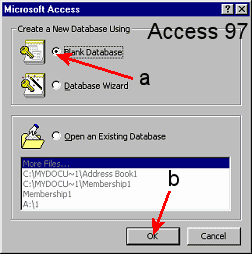
If you are using Access 97 you will be presented with
a window.
a) Click on Blank Databases (arrow a)
b) Click OK (arrow b)
|
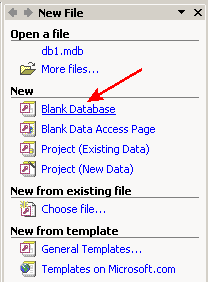
If using Access XP / 2002 you will be presented with a
blank screen.
a) If you don't see the New File column down the right
hand side, left click File and click New
b) Click on Blank Databases
|
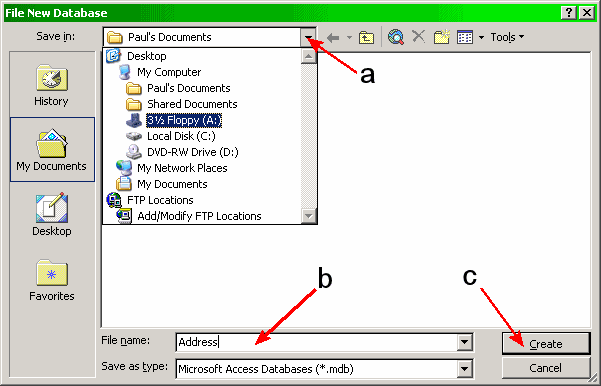
2) When the window in below appears, you will be asked
where the file is to be saved to and what name to give your new database file.
a) If you don't want to save to default location
(usually My Documents on your Hard Disk), Click on the Save in:
drop down (indicated by arrow a) and select destination drive (e.g. 31/2
Floppy (A:))
b) Give your Database a new filename (e.g. Type in
Address)
c) Click OK
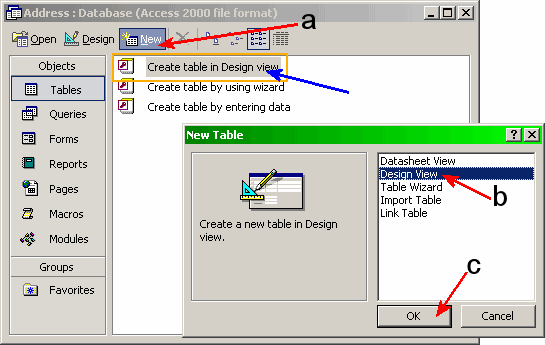
3) Click on New (arrow a), click Design View
(arrow b) and click OK. (arrow c) or in Access 2000 just
click Create table in Design View (indicated by the
blue arrow)
4) The next window will appear. This window decides:-
(The Field Name is the title of each of your columns,
(the top row of your database). First click on the first field and type in
Number, Serial number etc. It is best that your first field is your key field.
(figure a.4 – arrow 1)
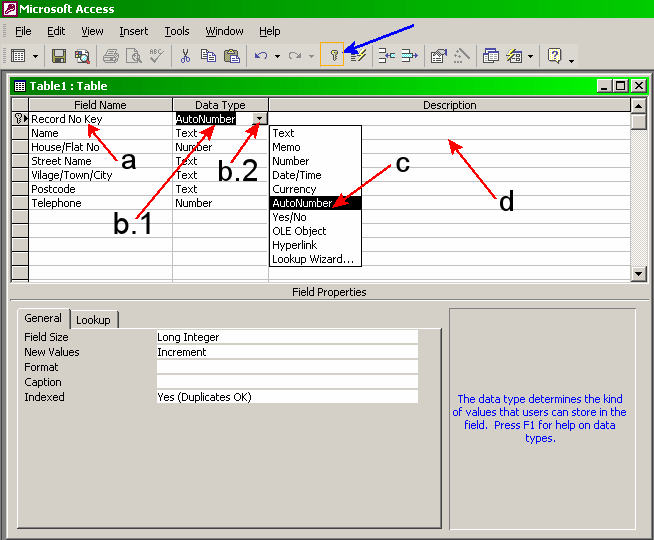
8) First click the left mouse button once on the first
empty box (in Field Name column). (indicated by arrow a). Once you have decided what you want to call your fields it
is time for the next step. You will now have to tell the database what Data type
(format of the data) you want to use.
a) First click the left mouse button once on the box
containing 'Text' next to your field name. (indicated by arrow b.1)
b) A drop down will appear. Click on the triangle. (indicated by arrow b.2)
A list of different formats will appear.
c) Now click on the Data Type format you wish to use for the field.
On the example above, I changed the data type from Text to AuroNumber. (indicated
by arrow c)
d) Repeat steps a) & b) until you have the right data type for each field.
e) You could also type in a description on the field. Click left mouse on one of
the blank cells and type in the description. (indicated by arrow d)
f) Now click on the First field (indicated by arrow a) and then click on the
key  button (indicated by
the
blue arrow).
button (indicated by
the
blue arrow).
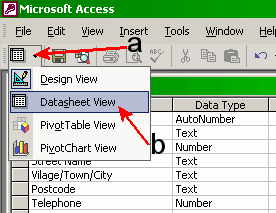
g) When you have finished, click the left mouse on the small
drop down triangle (the
first button on the toolbar, top left of the screen. (indicated below by arrow
a)
h) Click left mouse on Datasheet View.
(indicated below by arrow b)
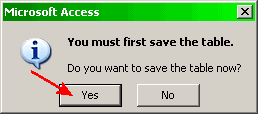
i) Now you will be asked to save. Click Yes
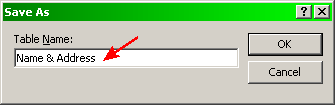
j) If this is the first time you have saved your
table, you will be asked for a Table Name. Type in e.g. Name & Address
and click OK
j) You will now be presented with a blank database.
k) Click on the first empty cell and type in your
data. You can use the Tab key to change to the next cell. If you are at
the end of a row, the next time you press Tab the next row will appear
automatically.
Back to Computer
Sharing Skills Index
Guides (c) Paul
Goates