Back to Computer Sharing Skills Index
Changing Fonts | Changing Text Colour | Header & Footers | Spelling And Grammar | Double Line spacing
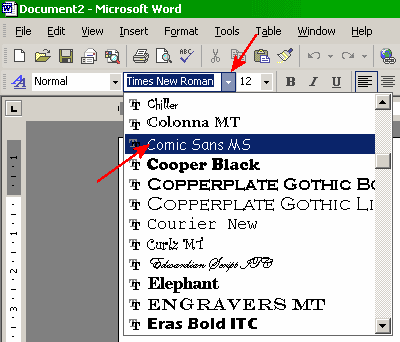
To change the font (text style) click on the button with the mouse indicated by the arrows on diagram below, then select the font name you want (i.e. Comic Sans MS). To change a font after you have typed in your text, you first highlight the text and then change the font.
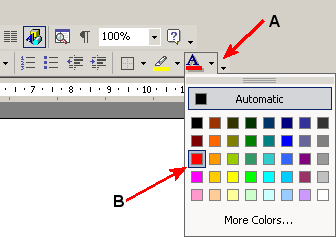
To change the colour of text you first highlight your text if you have already typed in your information, then click on the arrow next to the letter A (See below) and a window will drop down with a choice of colours. You then click on the colour of your choice (letter B).
A header is at the top of a page and can be used to put the same title or date on every page of your document. A Footer is at the base/bottom of your page and can be used to put a page number or a reference or date on each page of your document, basically anything you want at the top or bottom of your document.
To add a Header and footer to your document:-
1) Left Click on View (on menu bar) with the mouse
2) Then left click Header and Footer (a Header & Footer box will appear, along with a menu bar of buttons)
3) Click inside the Header box
4) Type in your text.
5) If you need to put a Footer onto the page click in the box at the bottom of the page or click button indicated by the red arrow and type in your text.
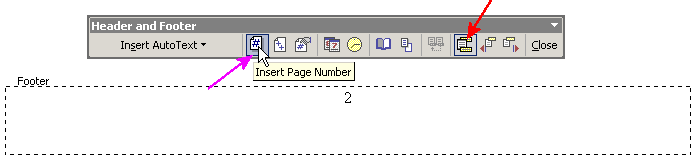
To insert a page number into your footer, click the button indicated by the purple arrow
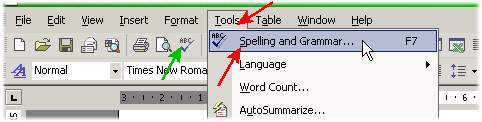
a) To use the spelling and grammar checker to manual scan the whole document, Left Click on the menu Tools and Left click Spelling and Grammar (or press the F7 key) (see red arrows in image below) or Left Click the ABC tool (see Green arrow in image below)
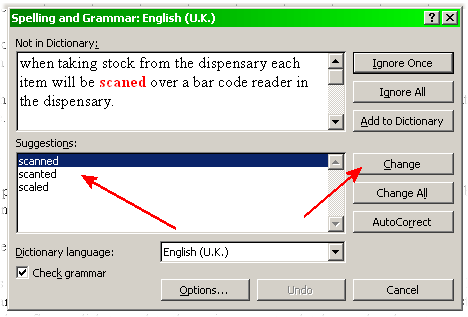
b) Click the correct suggestion and Left Click on Change. If the suggestion is wrong and you know your text is correct then Click Ignore Once to skip.
Word also has an automatic spelling and grammar
checker, which checks spelling as you type. If you make a spelling
error, the word is underlined in red. If you make a grammatical
error, the word is underlined in green.
(N.B. The underlines will only appear on screen. The
underlines will not appear when the document is
printed.)
|
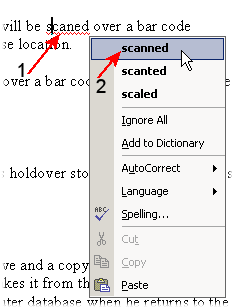
Spelling - When you make a spelling error you. 1) RIGHT click on the red underlined word. 2) LEFT click on correctly spelt word
|
Grammar - When you make a grammar error you. 1) RIGHT click on the green underlined word. 2) LEFT click on correctly spelt word. In this example, the word ‘changes’ needs a capital letter ‘C’.
|
To enable double spacing (add a blank space after each line of text) first:
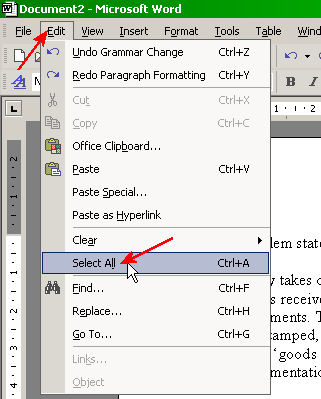
1) Highlight your text. To highlight all your text (the whole of your document) click Edit on the menu at the top of your screen and click Select All
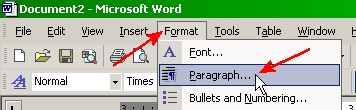
2) Click Format on the menu at the top of your screen and click Paragraph
3) Click on Line spacing dropdown (indicated by arrow a)
4) Click on Double (indicated by arrow b)
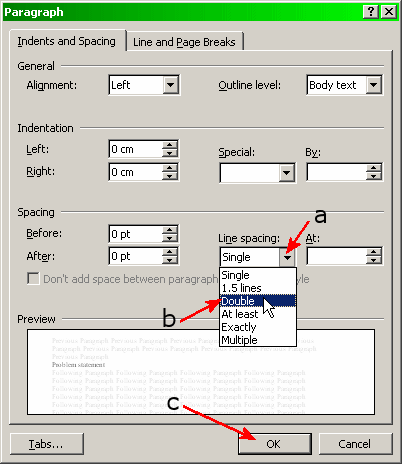
5) Click OK (indicated by arrow c)
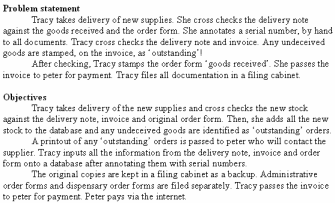
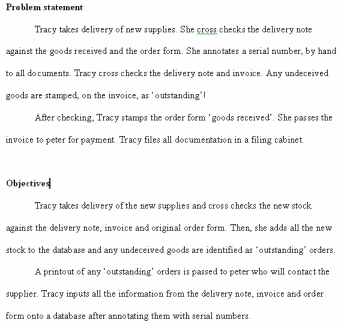
| Before (with Single Line spacing) | After (with Double Line spacing enabled) |
 |
 |
Back to Computer Sharing Skills Index