Back to Computer Sharing Skills Index
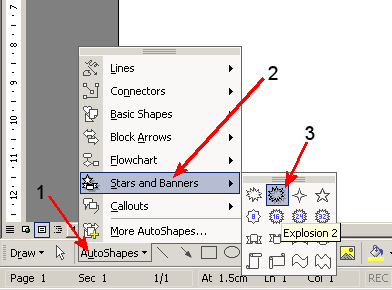
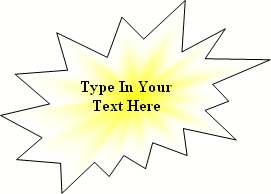
We will be using AutoShape 'Stars and Banners, explosion 2' as an example. To add AutoShapes to your document:
1) Left Click AutoShapes on the menu bar at the bottom of the screen. (A menu will appear).
2) Move your mouse over ‘Stars and Banners’ on menu.
3) Click on required shape (e.g. explosion 2).
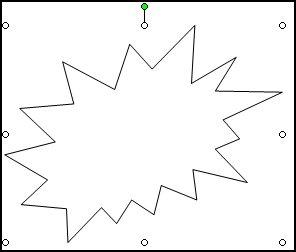
4) Mouse arrow will change to a cross. Move the mouse to the blank page, draw the shape by holding the left mouse button down. Release the mouse when the shape is the correct size. (To resize the shape, hold down left mouse button on one of the small black dots (circles) surrounding shape and move mouse until ‘shape’ is required size.)
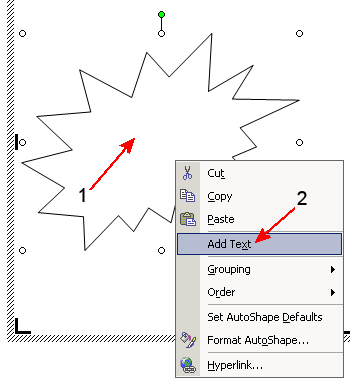
Text can be added to the ‘AutoShape’ by
doing the following:-
1) Right Click on the shape
2) Left Click Add Text
3) Type in your text
4) Click outside the text box, to end.

To colour/shade shapes etc:-
1) Left click on your AutoShape to select.
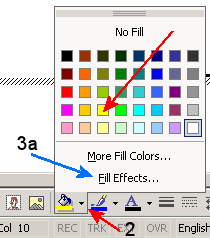 2) Left click on
the small arrow next to the ‘Fill Colour’
button (shape of a can of paint, red arrow 2). A palette of
colours will appear.
2) Left click on
the small arrow next to the ‘Fill Colour’
button (shape of a can of paint, red arrow 2). A palette of
colours will appear.
3) Plain colour:
Select a colour by clicking on it.
3) Gradient background:
If you require a Textured/Gradient background:
a) Left click Fill effects on palette (Blue arrow 3a). A window will appear.
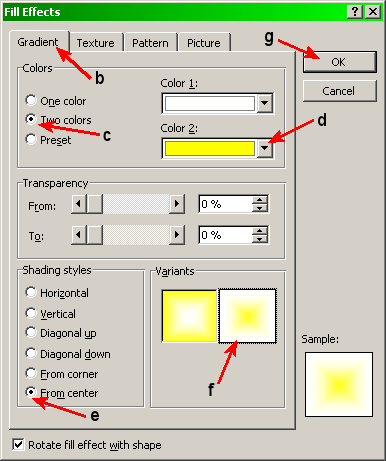
 b) Left click
Gradient tab (if you don't already have the Gradient tab
selected)
b) Left click
Gradient tab (if you don't already have the Gradient tab
selected)
c) Left click Two Colours
d) Left click small arrow next to colour 2 box and left click on your required colour.
e) Left click From Centre
f) Left click on second Variants box (box on the right)
g) Left click OK
3b) or if you require a Textured background,
click ‘Fill effects’ on palette. (A window will
appear).
4) Click Texture tab.
5) Select texture by left clicking on it.
6) Click OK.
Back to Computer Sharing Skills Index